How to Build Garden Steps
- Creations Building & Landscaping

- Apr 10
- 5 min read
Garden steps can completely change how an outdoor space works. They make sloped areas safer and easier to use, help connect patios and lawns, and can turn an awkward change in level into a feature that looks intentional. At Creations Building & Landscaping, we often build steps as part of wider landscaping, paving and brickwork projects across Reigate and Surrey, where the aim is not just access, but a finish that feels right for the garden and the house.
The basic process of building garden steps sounds simple: measure the slope, work out the number of steps, prepare the base, build the structure, then finish the treads and risers. In practice, though, good steps depend on accuracy. If the levels are off, the treads are inconsistent, or the base is not properly prepared, steps can end up uncomfortable, unstable or unsafe. That is why we treat garden steps as a proper build, not just a finishing touch.
Start by measuring the rise properly
The first step is to measure the total change in height between the lower level and the upper level. That total rise tells you how many steps are needed. From there, the layout needs to be worked out so that each step has a consistent rise and tread depth. Approved Document K says that where steps are part of the building, the steps in a flight should all have the same rise and going, and for private stairs the rise and going should fall within set ranges.
In a garden setting, consistency matters just as much as compliance. Even where formal building regulations may not apply, uneven steps are one of the quickest ways to make a garden feel poorly built. We always aim for steps that feel comfortable underfoot and suit the amount of space available, rather than forcing a layout that is too steep or cramped.
Think about where the steps sit in the overall garden design
Good garden steps should feel like part of the layout, not something dropped into the middle of it. That means thinking about how people move through the garden, how the steps line up with paths or patios, and whether the levels also need retaining edges or walls. On our landscaping page, we explain that proper groundwork, drainage and full project planning are what give an outdoor space long-term performance, and that is especially true with steps on sloping ground.
This is often where wider landscaping experience matters. A set of steps may also need adjoining paths, planting edges, raised planters or retaining walls to stop soil movement and give the whole area a cleaner finish. Our landscaping work regularly includes raised planters, patio laying and drainage preparation, all of which can play a part when steps are being added to a garden redesign.
Prepare the ground and foundations
Before any visible work starts, the area needs to be dug out and prepared properly. Loose ground, poor compaction and weak foundations are a common reason steps start to shift or crack later. The base should be excavated to the right depth, compacted, and built up with the correct sub-base so the steps have something solid to sit on.
This groundwork stage is also the time to think about drainage. If water is allowed to collect around the steps, the surface can become slippery and the structure can deteriorate more quickly. Our landscaping process includes levelling the ground and putting proper drainage in place to support a garden’s long-term performance, because there is no point building attractive steps on top of poor preparation.
Build the structure before the finish
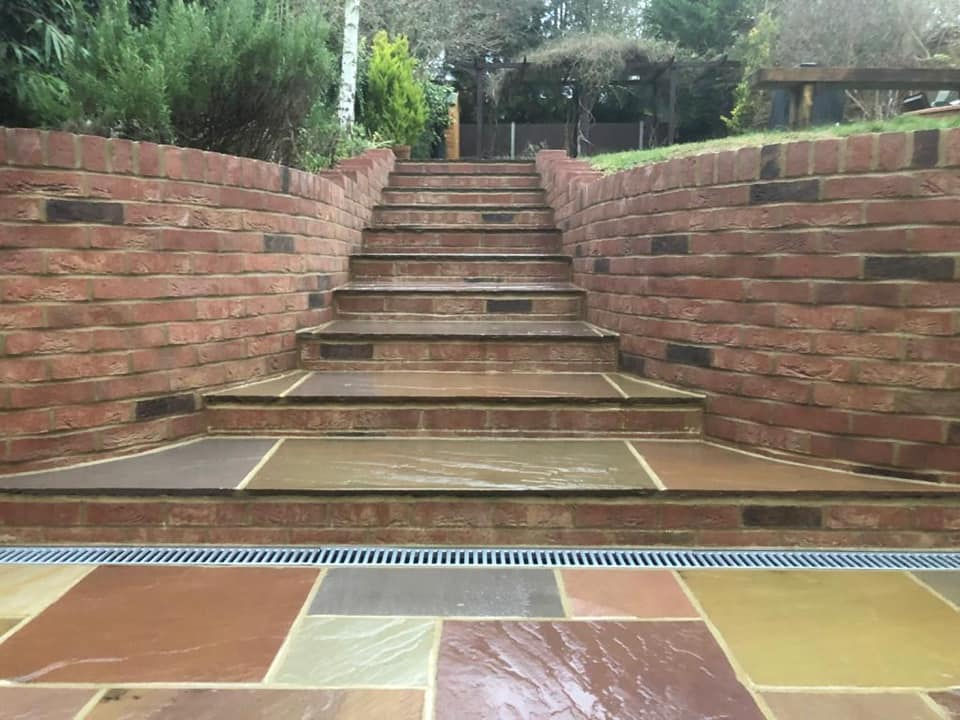
Once the base is in, the next stage is building the structure of the steps themselves. Depending on the design, that might mean creating solid masonry steps, forming them with blockwork or brick, or building a stable core that can then be faced with paving or stone. This is where accuracy matters most, because every tread and riser needs to line through correctly.
For some gardens, brick steps are the right choice. On our brickwork page, we highlight that we build brick steps, retaining walls and bespoke garden brickwork features, with finishes tailored to suit the property. Brick can work especially well where the steps need to tie into existing walls, edging or the house itself.
In other gardens, paving-led steps are a better fit. Our paving service covers patios, paths and custom layouts in materials including block paving, porcelain and natural stone, all of which can be used to create steps that match surrounding terraces and walkways. This usually creates a more unified look when the steps are part of a patio or link different paved zones together.
Choose materials that match the garden
Material choice has a big effect on how garden steps look and how well they wear. Brick steps tend to feel traditional, solid and architectural. Natural stone can feel softer and more timeless. Porcelain gives a cleaner, more contemporary finish. Block paving can work well where the steps need to match paths or drive areas. On our paving page, we note that each material suits different styles and budgets, and that edging stones help keep the finished work neat and secure.
The key is not just how the material looks on day one, but how it performs outside. Garden steps take regular foot traffic and have to cope with wet weather, dirt and seasonal changes. That is why we use quality materials and build details that are meant to last, rather than treating the steps as a purely decorative addition.
Check safety and access
One of the most important parts of building garden steps is making sure they are safe to use. That means consistent dimensions, solid construction, and enough space to approach and use them comfortably. Government guidance says that Approved Document K covers internal and external steps when they are part of the building, and Planning Portal notes that new external steps will not normally need building regulations approval unless they are part of the access to the building, in which case accessibility must not be made worse.
In practical terms, that means homeowners should be especially careful where steps lead directly to the house, replace level access, or involve a more complex change in levels. Those are the situations where professional design and build input becomes particularly important.
Finish the edges and tie everything together
The best garden steps do not stop at the last tread. They need proper edging, clean transitions into patios or paths, and a finish that looks intentional from every angle. Sometimes that includes side walls, retaining edges or adjoining planting to soften the structure. Sometimes it means matching paving joints and brick bonds so the steps feel like part of the original design. Our brickwork and paving services are often combined for exactly this reason.
That is also why steps are often best built as part of a wider garden improvement project rather than in isolation. When levels, materials and drainage are all considered together, the final result is stronger visually and structurally.
Our recommendation
If the question is how to build garden steps, the honest answer is that it starts with measuring and planning, but the quality of the finished result comes down to groundwork, structure and detail. Small errors in levels or preparation can have a big impact once the steps are in daily use.
At Creations Building & Landscaping, we recommend using a professional for garden steps where there is any meaningful change in level, where retaining work is needed, or where the steps need to tie into patios, paths or brickwork. We already build brick steps and retaining walls, install patios and paving, and carry out full landscaping projects across Reigate and Surrey, so we can make sure the steps look right and perform properly for years to come.
If you’re planning a sloped garden or want steps that feel like part of a complete redesign, Creations Building & Landscaping can help with the full process, from groundwork and layout through to the final finish.


Comments